简介
本教程指南演示如何使用 Visual Studio Code Web 客户端在 GitHub Codespaces 中设置示例 C# (.NET) 项目。它将引导您完成在 Codespace 中打开项目以及添加和修改预定义开发容器配置的过程。
完成本教程后,您将能够使用 VS Code Web 客户端或 VS Code 桌面应用程序将开发容器配置添加到您自己的代码库中。
有关开发容器的更多信息,请参阅“开发容器简介”。
步骤 1:在 Codespace 中打开项目
-
如果您尚未登录,请登录 GitHub.com。
-
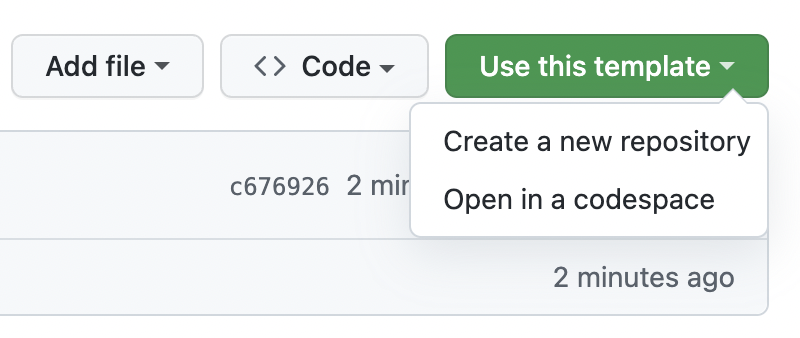
单击使用此模板,然后单击在 Codespace 中打开。

创建 Codespace 时,您的项目会在专用于您的远程虚拟机上创建。默认情况下,Codespace 的容器包含许多语言和运行时,包括 .NET。它还包含一组常用的工具,例如 git、wget、rsync、openssh 和 nano。
您可以通过调整 vCPU 和 RAM 的数量、添加点文件以个性化您的环境或修改已安装的工具和脚本来自定义您的 Codespace。有关更多信息,请参阅“自定义您的 Codespace”。
GitHub Codespaces 使用名为devcontainer.json的文件来配置在 Codespace 中工作时使用的开发容器。每个存储库可以包含一个或多个devcontainer.json文件,以便为您提供在 Codespace 中处理代码所需的确切开发环境。
启动时,GitHub Codespaces 使用devcontainer.json文件以及构成开发容器配置的任何相关文件来安装工具和运行时,并执行项目所需的其它设置任务。有关更多信息,请参阅“开发容器简介”。
步骤 2:添加开发容器配置
GitHub Codespaces 的默认开发容器(或“开发容器”)预装了最新的 .NET 版本和常用工具。但是,我们建议您配置自己的开发容器以包含项目所需的所有工具和脚本。这将确保您的存储库中所有 GitHub Codespaces 用户都拥有完全可重现的环境。
要设置存储库以使用自定义开发容器,您需要创建一个或多个devcontainer.json文件。您可以从 Visual Studio Code 中的预定义配置模板添加这些文件,也可以自己编写。有关开发容器配置的更多信息,请参阅“开发容器简介”。
-
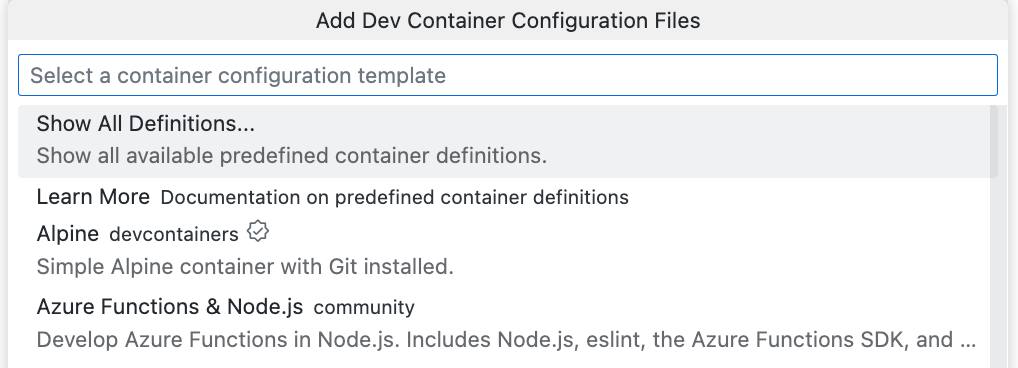
访问 Visual Studio Code 命令面板(Shift+Command+P / Ctrl+Shift+P),然后开始键入“add dev”。单击Codespaces:添加开发容器配置文件。

-
单击创建新的配置。
-
在此示例中,您从中创建 Codespace 的模板存储库已包含开发容器配置,因此会显示一条消息,告知您配置文件已存在。我们将覆盖现有的配置文件,因此请单击继续。
-
单击显示所有定义。
-
键入
c#并单击C# (.NET)。如果您的项目使用特定工具,则可以使用其他选项。例如,C# 和 MS SQL。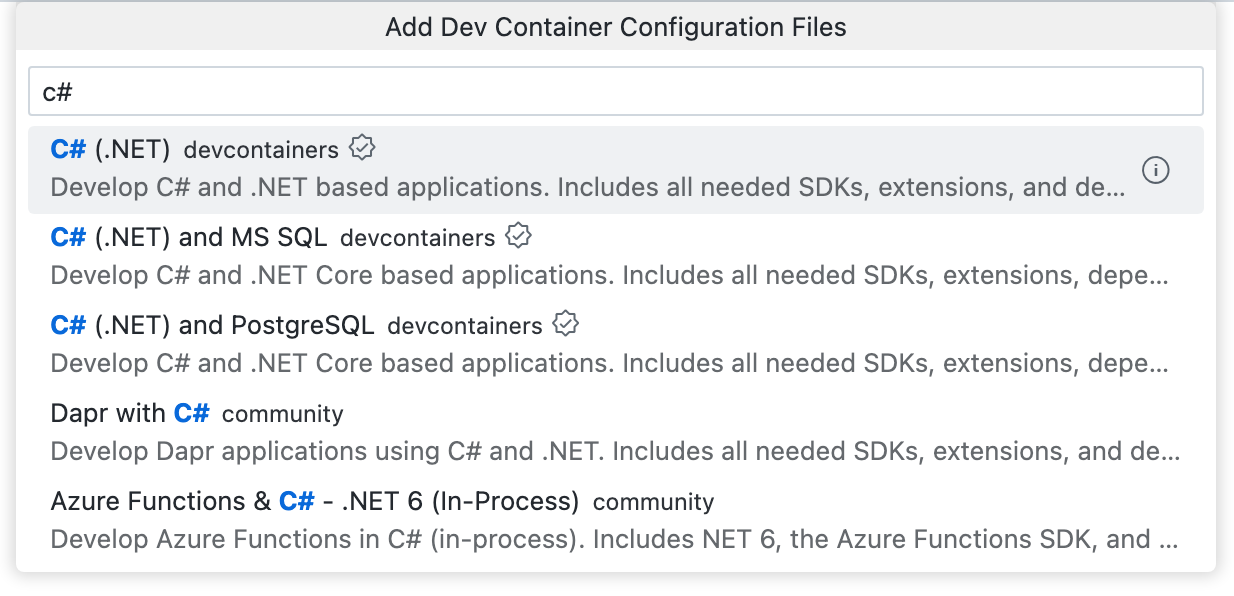
-
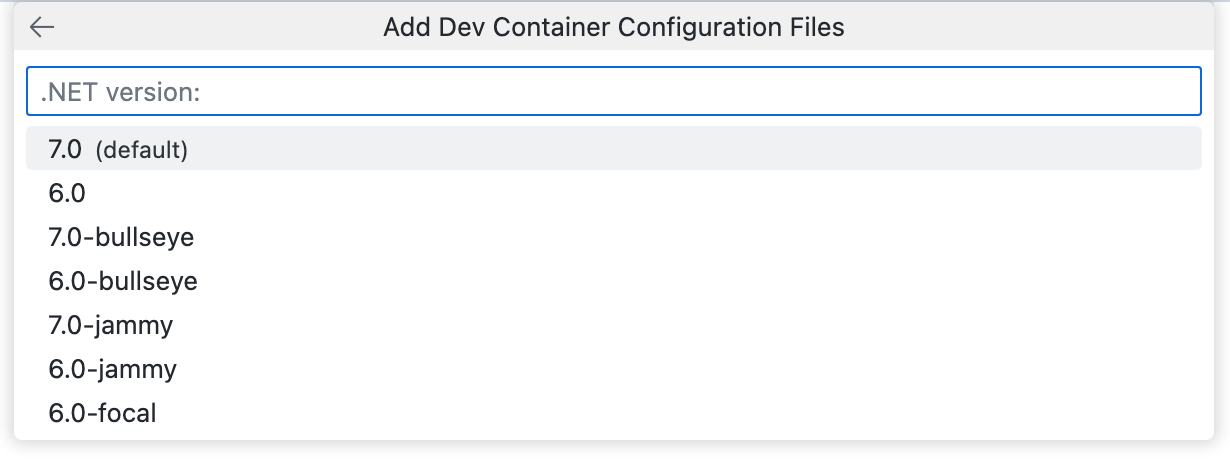
选择要用于项目的 .NET 版本。在本例中,选择标记为“(默认)”的版本。
-
将显示附加功能列表。我们将安装 .NET CLI,这是一个用于开发、构建、运行和发布 .NET 应用程序的命令行界面。要安装此工具,请键入
dotnet,选择Dotnet CLI,然后单击确定。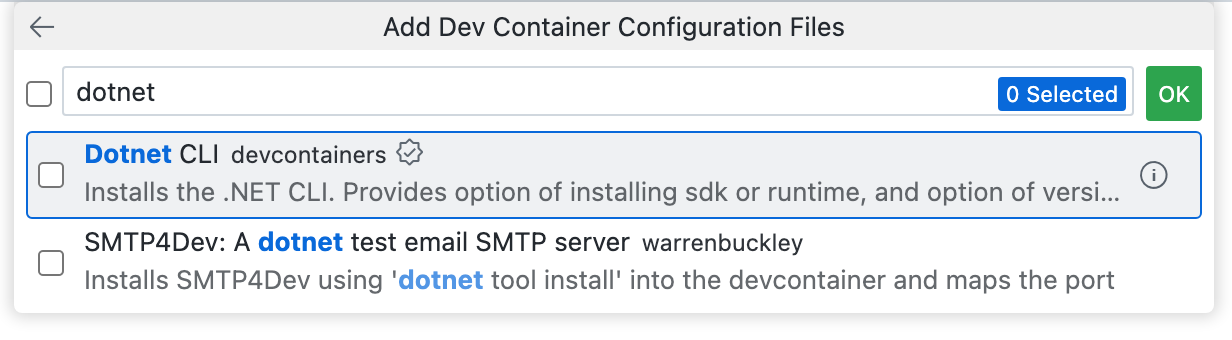
-
将显示一条消息,告知您开发容器配置文件已存在。单击覆盖。
将创建一个
devcontainer.json文件,并在编辑器中打开。


自定义开发容器配置的详细信息
如果您查看 Visual Studio Code 资源管理器,您会看到一个.devcontainer目录已添加到项目的存储库根目录中,其中包含devcontainer.json文件。这是从此存储库创建的 Codespace 的主要配置文件。
devcontainer.json
您添加的devcontainer.json文件将包含name、image和features属性的值。包含一些可能有用的附加属性,但已注释掉。
根据您选择的镜像,该文件看起来类似于以下内容:
// For format details, see https://aka.ms/devcontainer.json. For config options, see the
// README at: https://github.com/devcontainers/templates/tree/main/src/dotnet
{
  "name": "C# (.NET)",
  // Or use a Dockerfile or Docker Compose file. More info: https://containers.dev/guide/dockerfile
  "image": "mcr.microsoft.com/devcontainers/dotnet:0-7.0",
  "features": {
    "ghcr.io/devcontainers/features/dotnet:1": {}
  }

  // Features to add to the dev container. More info: https://containers.dev/features.
  // "features": {},

  // Use 'forwardPorts' to make a list of ports inside the container available locally.
  // "forwardPorts": [5000, 5001],
  // "portsAttributes": {
  //   "5001": {
  //     "protocol": "https"
  //   }
  // }

  // Use 'postCreateCommand' to run commands after the container is created.
  // "postCreateCommand": "dotnet restore",

  // Configure tool-specific properties.
  // "customizations": {},

  // Uncomment to connect as root instead. More info: https://aka.ms/dev-containers-non-root.
  // "remoteUser": "root"
}
- name:您可以将开发容器命名为任何您想要的名字。系统会提供默认值。
- image:容器注册表(DockerHub、GitHub 容器注册表或Azure 容器注册表)中将用于创建 Codespace 开发容器的镜像名称。
- features:一个或多个对象的列表,每个对象都引用一个可用的开发容器功能。功能是独立的、可共享的安装代码和开发容器配置单元。它们提供了一种简单的方法,可以向您的开发容器添加更多工具、运行时或库功能。您可以在 VS Code 中或 GitHub 上的
devcontainer.json编辑器中添加功能。有关更多信息,请单击“向 devcontainer.json 文件添加功能”中的Visual Studio Code或Web 浏览器选项卡。 - forwardPorts:此处列出的任何端口都将自动转发。有关更多信息,请参阅“转发 Codespace 中的端口”。
- portsAttributes - 此属性将指定的端口映射到一个或多个默认选项。有关更多信息,请参阅开发容器网站上的开发容器规范。
- postCreateCommand:使用此属性可在创建 Codespace 后运行命令。这可以格式化为字符串(如上所示)、数组或对象。有关更多信息,请参阅开发容器网站上的开发容器规范。
- customizations:此属性允许您在使用工具或服务在 Codespace 中工作时对其进行自定义。例如,您可以为 VS Code 配置特定设置和扩展。有关更多信息,请参阅开发容器网站上的支持工具和服务。
- remoteUser:默认情况下,您以 vscode 用户身份运行,但您可以选择将其设置为 root。
有关可用属性的完整列表,请参阅开发容器网站上的开发容器规范。
其他开发容器配置文件
如果您熟悉 Docker,除了devcontainer.json文件外,您可能还希望使用 Dockerfile 或 Docker Compose 来配置 Codespace 环境。您可以通过在devcontainer.json文件旁边添加您的Dockerfile或docker-compose.yml文件来实现此目的。有关更多信息,请参阅开发容器网站上的使用镜像、Dockerfile 和 Docker Compose。
步骤 3:修改您的 devcontainer.json 文件
添加开发容器配置并基本了解所有内容的功能后,您现在可以进行更改以进一步自定义您的环境。在此示例中,您将添加以下属性:
- 将应用程序在远程计算机上运行的端口转发到本地计算机。
- 创建开发容器后,运行
dotnet restore以恢复应用程序所需的依赖项。 - 在此 Codespace 中自动安装 VS Code 扩展。
-
在
devcontainer.json文件中,在features属性之后添加逗号,并删除关于功能的两行注释。JSONC "features": { "ghcr.io/devcontainers/features/dotnet:1": {} }, // Features to add to the dev container. More info: https://containers.dev/features. // "features": {},"features": { "ghcr.io/devcontainers/features/dotnet:1": {} }, // Features to add to the dev container. More info: https://containers.dev/features. // "features": {}, -
取消
forwardPorts属性的注释,并将其值更改为仅端口5000。JSONC // Use 'forwardPorts' to make a list of ports inside the container available locally. "forwardPorts": [5000],
// Use 'forwardPorts' to make a list of ports inside the container available locally. "forwardPorts": [5000], -
取消
postCreateCommand属性的注释。JSONC // Use 'postCreateCommand' to run commands after the container is created. "postCreateCommand": "dotnet restore",
// Use 'postCreateCommand' to run commands after the container is created. "postCreateCommand": "dotnet restore", -
取消
customizations属性的注释,并按如下所示进行编辑以安装“代码拼写检查器”VS Code 扩展。JSONC // Configure tool-specific properties. "customizations": { // Configure properties specific to VS Code. "vscode": { // Add the IDs of extensions you want installed when the container is created. "extensions": [ "streetsidesoftware.code-spell-checker" ] } }// Configure tool-specific properties. "customizations": { // Configure properties specific to VS Code. "vscode": { // Add the IDs of extensions you want installed when the container is created. "extensions": [ "streetsidesoftware.code-spell-checker" ] } }根据您选择的镜像,
devcontainer.json文件现在应该看起来类似于以下内容:// For format details, see https://aka.ms/devcontainer.json. For config options, see the // README at: https://github.com/devcontainers/templates/tree/main/src/dotnet { "name": "C# (.NET)", // Or use a Dockerfile or Docker Compose file. More info: https://containers.dev/guide/dockerfile "image": "mcr.microsoft.com/devcontainers/dotnet:0-7.0", "features": { "ghcr.io/devcontainers/features/dotnet:1": {} }, // Use 'forwardPorts' to make a list of ports inside the container available locally. "forwardPorts": [5000], // "portsAttributes": { // "5001": { // "protocol": "https" // } // } // Use 'postCreateCommand' to run commands after the container is created. "postCreateCommand": "dotnet restore", // Configure tool-specific properties. "customizations": { // Configure properties specific to VS Code. "vscode": { // Add the IDs of extensions you want installed when the container is created. "extensions": [ "streetsidesoftware.code-spell-checker" ] } } // Uncomment to connect as root instead. More info: https://aka.ms/dev-containers-non-root. // "remoteUser": "root" } -
保存您的更改。
-
访问 VS Code 命令面板(Shift+Command+P / Ctrl+Shift+P),然后开始键入“rebuild”。单击Codespaces:重建容器。

提示
您可能偶尔需要执行完全重建以清除缓存并使用新的镜像重建容器。有关更多信息,请参阅“重建 Codespace 中的容器”。在 Codespace 内重建可确保您的更改在您将更改提交到存储库之前按预期工作。如果某些内容导致失败,您将被放置在一个具有恢复容器的 Codespace 中,您可以从中重建以继续调整容器。
重建开发容器后,您的 Codespace 再次可用,
postCreateCommand将已运行,恢复所需的依赖项,“代码拼写检查器”扩展将可用。

步骤 4:运行您的应用程序
在上一节中,您使用postCreateCommand通过dotnet restore命令安装了一组包。现在已安装依赖项,您可以运行应用程序。
-
按
F5或在终端中输入dotnet watch run来运行应用程序。 -
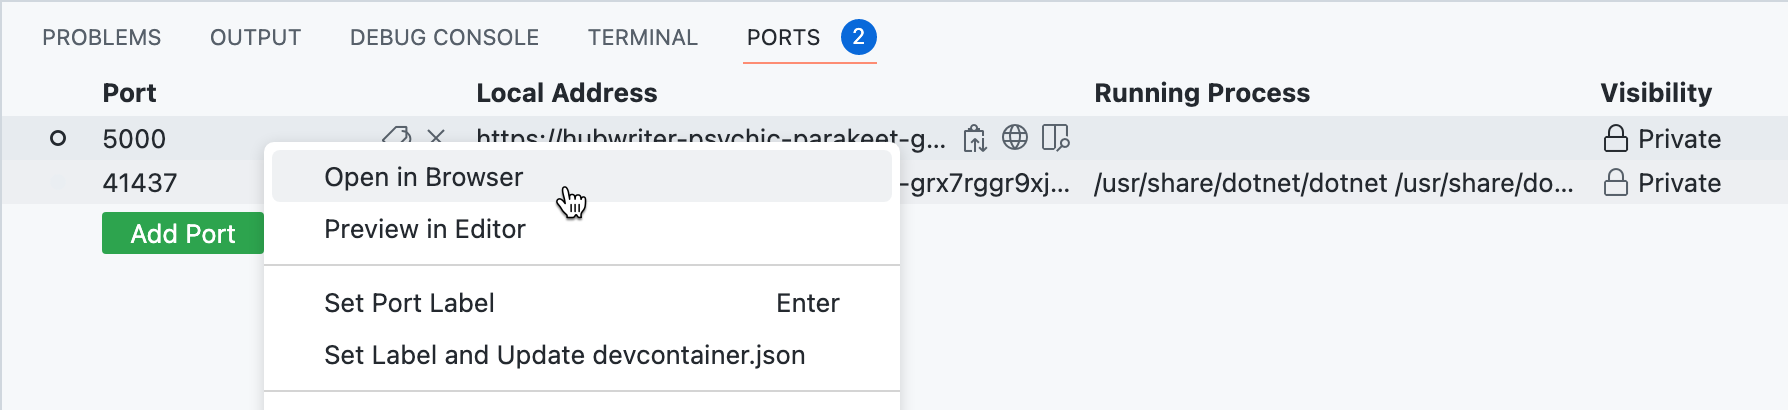
应用程序启动后,单击端口选项卡,右键单击端口 5000,然后单击在浏览器中打开。

步骤 5:提交您的更改
对 Codespace 进行更改后(无论是新代码还是配置更改),您都需要提交更改。将配置更改提交到存储库可确保从该存储库创建 Codespace 的任何其他人也都拥有相同的配置。您所做的任何自定义(例如添加 VS Code 扩展)都将对所有用户可用。
在本教程中,您是从模板存储库创建 Codespace 的,因此 Codespace 中的代码尚未存储在存储库中。您可以通过将当前分支发布到 GitHub 来创建一个存储库。
更多信息,请参见“在您的 Codespace 中使用源代码控制”。
后续步骤
您现在应该能够将自定义开发容器配置添加到您自己的 C# (.NET) 项目中。
以下是针对更高级场景的一些其他资源。