关于 Azure Data Studio 中的 GitHub Copilot 扩展
在 Azure Data Studio 中安装 GitHub Copilot 扩展,允许您在键入时从 Copilot 接收代码建议。
要查看其他常用编码环境的说明,请使用页面顶部的工具切换器。
在 Azure Data Studio 中安装 GitHub Copilot 扩展
-
确保您可以访问 GitHub Copilot。有关信息,请参阅“什么是 GitHub Copilot?”。
-
确保您拥有兼容版本的 Azure Data Studio。要在 Azure Data Studio 中使用 GitHub Copilot,您必须安装 Azure Data Studio 1.44.0 或更高版本。请参阅 Azure Data Studio 文档中的Azure Data Studio 下载页面。
-
在 Azure Data Studio 中安装 GitHub Copilot 扩展。请参阅 Microsoft 文档中的安装 GitHub Copilot 扩展。
-
如果 Azure Data Studio 中的弹出窗口提示您登录以使用 GitHub Copilot,请单击**登录 GitHub**并按照屏幕上的说明操作。
- 如果您之前已在 GitHub 上为您的帐户授权 Azure Data Studio,则 GitHub Copilot 将自动获得授权。
- 如果您没有收到授权提示,您可以单击 Azure Data Studio 窗口底部面板中的铃铛图标查看通知。
-
如果您正在按照授权步骤操作,则在您的浏览器中,GitHub 将请求 GitHub Copilot 的必要权限。要批准这些权限,请单击**授权 Azure Data Studio**。
关于 JetBrains IDE 中的 GitHub Copilot 扩展
在 JetBrains IDE 中安装 GitHub Copilot 扩展,允许您与 IDE 中的 Copilot 聊天,并在键入时从 Copilot 接收代码建议。
要查看其他常用编码环境的说明,请使用页面顶部的工具切换器。
版本兼容性
有关 JetBrains IDE 中 GitHub Copilot 扩展的版本兼容性信息,请参阅 JetBrains Marketplace 中的GitHub Copilot 版本。
关于 JetBrains IDE 中 GitHub Copilot 插件的许可
GitHub, Inc. 是 JetBrains 插件的许可方。此插件的最终用户许可协议是GitHub 附加产品和功能条款,使用此插件须遵守这些条款。JetBrains 对此插件或此类协议不承担任何责任或义务。使用此插件即表示您同意上述条款。
在您的 JetBrains IDE 中安装 GitHub Copilot 插件
以下步骤将指导您完成在 IntelliJ IDEA 中安装 GitHub Copilot 插件的过程。在其他受支持的 IDE 中安装插件的步骤可能有所不同。
-
确保您可以访问 GitHub Copilot。有关信息,请参阅“什么是 GitHub Copilot?”。
-
确保您拥有与 GitHub Copilot 兼容的 JetBrains IDE。GitHub Copilot 与以下 IDE 兼容:
- IntelliJ IDEA(Ultimate、Community、Educational)
- Android Studio
- AppCode
- CLion
- Code With Me 客戶端
- DataGrip
- DataSpell
- GoLand
- JetBrains Client
- MPS
- PhpStorm
- PyCharm(Professional、Community、Educational)
- Rider
- RubyMine
- RustRover
- WebStorm
- Writerside
请参阅JetBrains IDE工具查找器以下载。
-
安装 JetBrains 的 GitHub Copilot 插件。请参阅 JetBrains Marketplace 中的GitHub Copilot 插件。
-
安装 GitHub Copilot 后,单击**重新启动 IDE**。
-
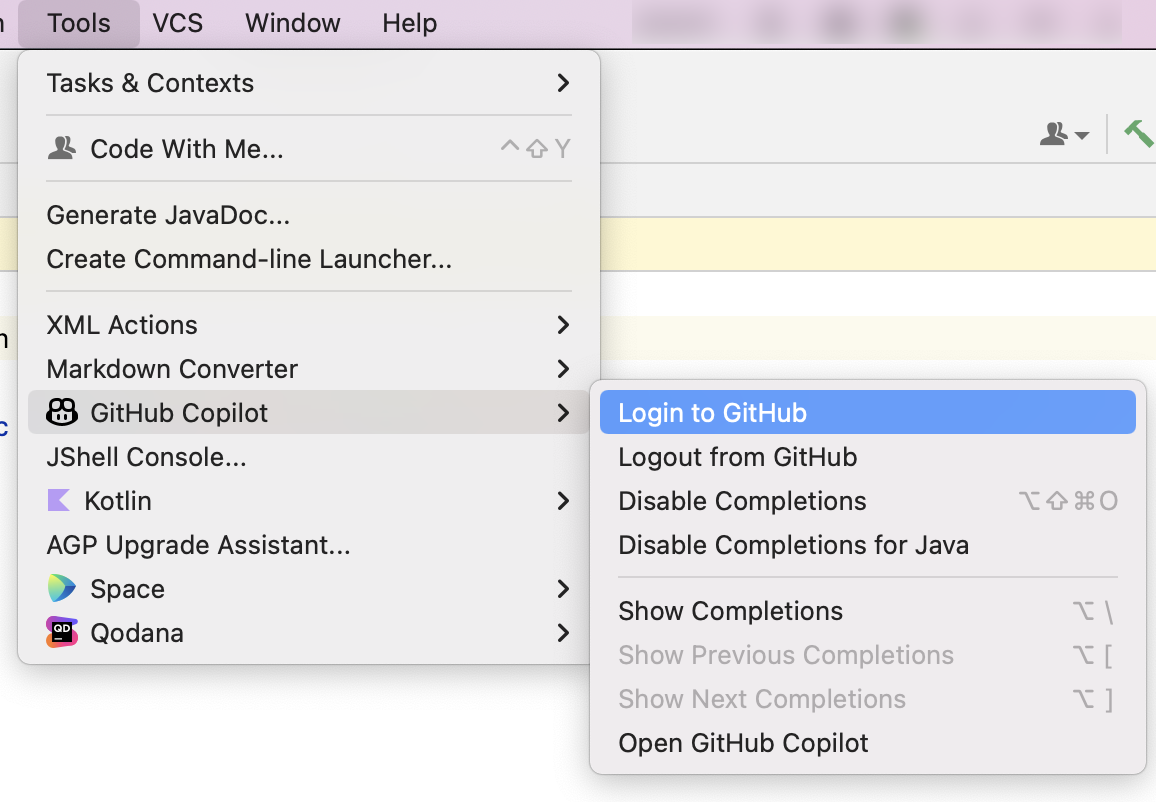
JetBrains IDE 重新启动后,单击**工具**菜单。单击**GitHub Copilot**,然后单击**登录 GitHub**。

-
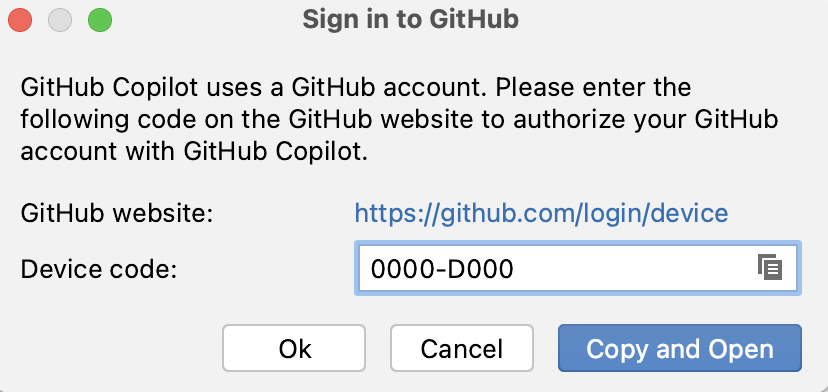
在“登录 GitHub”对话框中,要复制设备代码并打开设备激活窗口,请单击**复制并打开**。

-
设备激活窗口将在您的浏览器中打开。粘贴设备代码,然后单击**继续**。
-
GitHub 将请求 GitHub Copilot 的必要权限。要批准这些权限,请单击**授权 GitHub Copilot 插件**。
-
权限批准后,您的 JetBrains IDE 将显示确认信息。要开始使用 GitHub Copilot,请单击**确定**。
关于 Vim/Neovim 中的 GitHub Copilot 扩展
在 Vim/Neovim 中安装 GitHub Copilot 扩展,允许您在键入时从 Copilot 接收代码建议。
要查看其他常用编码环境的说明,请使用页面顶部的工具切换器。
在 Vim/Neovim 中安装 GitHub Copilot 扩展
GitHub 建议您使用 Vim/Neovim 的内置插件管理器安装 GitHub Copilot 插件。或者,您可以使用您选择的插件管理器安装`github/copilot.vim`。有关更多信息,请参阅copilot.vim 存储库。
-
确保您可以访问 GitHub Copilot。有关信息,请参阅“什么是 GitHub Copilot?”。
-
确保您已安装兼容版本的 Vim/Neovim。要在 Vim/Neovim 中使用 GitHub Copilot,您必须拥有 Vim 9.0.0185/Neovim 0.6 或更高版本以及 Node.js 18 或更高版本。请参阅Vim/Neovim 文档和Node.js 网站。
-
使用内置插件管理器安装 GitHub Copilot
-
对于**macOS 或 Linux 上的 Neovim**,请在终端中运行以下命令。
Shell git clone https://github.com/github/copilot.vim \ ~/.config/nvim/pack/github/start/copilot.vim
git clone https://github.com/github/copilot.vim \ ~/.config/nvim/pack/github/start/copilot.vim -
对于**Windows 上的 Neovim**,请在 Git Bash 中运行以下命令。
Shell git clone https://github.com/github/copilot.vim.git \ $HOME/AppData/Local/nvim/pack/github/start/copilot.vim
git clone https://github.com/github/copilot.vim.git \ $HOME/AppData/Local/nvim/pack/github/start/copilot.vim -
对于**macOS 或 Linux 上的 Vim**,请在终端中运行以下命令。
Shell git clone https://github.com/github/copilot.vim \ ~/.vim/pack/github/start/copilot.vim
git clone https://github.com/github/copilot.vim \ ~/.vim/pack/github/start/copilot.vim -
对于**Windows 上的 Vim**,请在 Git Bash 中运行以下命令。
Shell git clone https://github.com/github/copilot.vim.git \ $HOME/vimfiles/pack/github/start/copilot.vim
git clone https://github.com/github/copilot.vim.git \
$HOME/vimfiles/pack/github/start/copilot.vim
-
-
要配置 GitHub Copilot,请打开 Vim/Neovim 并输入以下命令。
Shell :Copilot setup
:Copilot setup -
在您的 Vim/Neovim 配置中启用 GitHub Copilot,或使用 Vim/Neovim 命令。
Shell :Copilot enable
:Copilot enable
关于 Visual Studio 中的 GitHub Copilot 扩展
在 Visual Studio 中安装 GitHub Copilot 扩展,允许您在键入时从 Copilot 接收代码建议。
要查看其他常用编码环境的说明,请使用页面顶部的工具切换器。
版本兼容性
从 Visual Studio 2022 版本 17.10 开始,统一的 Copilot 和 GitHub Copilot Chat 扩展默认情况下包含为内置组件。有关更多信息,请参阅 Microsoft 文档中的“在 Visual Studio 中安装 GitHub Copilot”。
在 Visual Studio 中安装 GitHub Copilot 扩展
-
确保您可以访问 GitHub Copilot。有关信息,请参阅“什么是 GitHub Copilot?”。
-
确保您已安装兼容版本的 Visual Studio。要在 Visual Studio 中使用 GitHub Copilot,您必须安装 Windows 版 Visual Studio 2022 17.8 或更高版本。有关更多信息,请参阅 Microsoft 文档中的“安装 Visual Studio”。
-
在 Visual Studio 中安装 GitHub Copilot。请参阅 Microsoft 文档中的“在 Visual Studio 中安装 GitHub Copilot”。
-
安装 GitHub Copilot 扩展后,要启用 GitHub Copilot,请确保您已将您的 GitHub 帐户添加到 Visual Studio。有关更多信息,请参阅 Microsoft 文档中的将您的 GitHub 帐户添加到 Visual Studio 密钥链。
关于 Visual Studio Code 中的 GitHub Copilot 扩展
在 Visual Studio Code 中安装 GitHub Copilot 扩展,允许您在键入时从 Copilot 接收代码建议。它还会自动安装 GitHub Copilot Chat 扩展,允许您与 Copilot 聊天。
要查看其他常用编码环境的说明,请使用页面顶部的工具切换器。
版本兼容性
由于 Copilot Chat 与 Visual Studio Code 深度集成,因此 GitHub Copilot Chat 的更改与 Visual Studio Code 版本同步。因此,每个新版本的 Copilot Chat 只与最新版本的 Visual Studio Code 兼容。这意味着如果您使用的是较旧版本的 Visual Studio Code,则无法使用最新的 Copilot Chat。
只有最新的 Copilot Chat 版本将使用 Copilot 服务提供的最新的大型语言模型,因为即使是较小的模型升级也需要提示更改和扩展中的修复。较旧版本的 Copilot Chat 将继续使用最新版本的 Copilot 代码补全。
在 Visual Studio Code 中安装 GitHub Copilot 扩展
-
确保您可以访问 GitHub Copilot。有关信息,请参阅“什么是 GitHub Copilot?”。
-
安装 Visual Studio Code。请参阅Visual Studio Code 下载页面。
-
在 Visual Studio Code 中安装GitHub Copilot 扩展。有关详细说明,请参阅 Visual Studio Code 文档中的“在 Visual Studio Code 中设置 GitHub Copilot”。
注意
Xcode 的 GitHub Copilot 扩展处于公开预览阶段,可能会发生变化。
关于 Xcode 的 GitHub Copilot 扩展
安装 Xcode 的 GitHub Copilot 扩展,允许您在键入时从 Copilot 接收代码建议。
要查看其他常用编码环境的说明,请使用页面顶部的工具切换器。
安装 Xcode 的 GitHub Copilot 扩展
- 确保您可以访问 GitHub Copilot。有关信息,请参阅“关于 GitHub Copilot”。
- 确保已安装兼容版本的 Xcode。要使用适用于 Xcode 的 GitHub Copilot,您必须拥有 Xcode 8.0 或更高版本以及 macOS Monterey (12.0) 或更高版本。请访问 Apple 开发者网站查看 Xcode。
- 从
github/CopilotForXcode仓库 下载适用于 Xcode 的 GitHub Copilot 扩展程序的最新版本并安装它。将添加一个后台项目,以便应用程序能够在 Xcode 启动时自行启动。
授予必要的权限
要使用此扩展程序,需要两个权限:“辅助功能”和“Xcode 源代码编辑器扩展程序”。首次启动扩展程序时,系统会提示您启用“辅助功能”权限。
需要手动启用“Xcode 源代码编辑器扩展程序”权限。
- 打开 GitHub Copilot 扩展程序应用程序。
- 点击扩展程序权限,然后点击Xcode 源代码编辑器。
- 启用 GitHub Copilot 并点击完成。
授予必要的权限后,重启 Xcode。您将在“编辑”菜单中看到一个名为“GitHub Copilot”的新项目。
登录 GitHub Copilot
在您可以使用适用于 Xcode 的 GitHub Copilot 扩展程序之前,您需要授权该扩展程序访问您的 GitHub 帐户。
- 打开 GitHub Copilot 扩展程序应用程序。
- 点击登录 GitHub 并按照提示授权扩展程序。
后续步骤
- 开始使用 Copilot - 了解如何在您首选的编码环境中使用 Copilot。请参阅“在您的 IDE 中使用 GitHub Copilot 获取代码建议”。